Showing posts with label Vintage. Show all posts

Wednesday, July 13, 2016

Beach Dress and Coat : Simplicity 8139


Happy Summer sewists! It's my favorite sewing season, there are so many fun things to sew, like this new BEACH DRESS! I'm straight out of Beach Blanket Bingo right now and loving it. You will find me frolicking along the Jersey Shore in this all summer long. 


The pattern is a vintage re-release from Simplicity, 8139. The bathing dress and beach coat pattern is from the 1950's. I love that I get to recreate this vintage look, because it's something I'd never be able to find in my size normally. 


The dress is made with seersucker and has a full knit romper lining underneath, I had to make a few adjustments to get it to fit. I had to add two inches of length to the bra cups to cover everything up there. And then I had to add another inch to the bodice length because of my long torso. After I made it I had to take off some shoulder length to keep the back from gaping. 


The bust portion is made to be gathered. Kind of like the Sweetheart Sundress from Gertie's first book. I hand sewed some stitches to either side of the center front seam and pulled to gather them. Then the bow is tied around the bust. There is a whole left under the bust to slide the sash though. 


I finished the hem with rick rack, because everything is better with rick rack. I love having the knit romper under the short skirt, I am free to frolic without worrying about wind and such. 


I made a beach coat to match too! It's perfect for going from early morning "chill" to later when its hotter on the beach. I made it with a terrycloth outer and the seersucker lining. It has a button closure, over-sized pockets, with more rick rack, and sleeves that you roll up to have cuffs. 


This is so comfortable, and I have already worn it a lot, lounging on the deck, riding my bike around and at the bay beach. I want to add rompers under all my clothes now. What do you guys sew in the summer?


Pin It Now!

Friday, February 5, 2016

Vintage Plaid Jacket: Simplicity 3622


Oh hey 2016, how would you like a blog post? I've been making things this whole time but my pictures have not been cooperating. But this coat is too cute not to show off! 


The pattern is a vintage one I scored off of Etsy, Simplicity 3622. I shortened it so it would end at the hip. This is my first time really jumping in and working with plaid. I just haven't been that into it, but this wool is irresistible. Working at a fabric store is dangerous, every time I walked by the wool section I could picture the coat in my head. I wanted a classic jacket, and this black and white plaid is perfect for it. Cutting it out was a bit nerve-wracking. There is a lot to think about, what needs to match up and where to line up the bolder stripe.


I cut out the wool using the tutorial from Sewaholic. Pinning the plaids stripes together so you can cut the pieces doubled. This was easy and all of my pieces are identical. Then I just made sure my notches were at the same spot for pieces that would be connected.


The welt pockets went in easily, I followed the directions that came with the pattern, Vintage patterns have the best directions. They don't skip over steps to make it "Sew Easy". For the bags of the pockets I used black pocketing fabric I bought from etsy. 


For the interfacing I mainly followed the pattern's directions are using muslin for interfacing and basted it on. I used fusible interfacing for the peter pan color, and the hems. The sleeves were eased in trying to match the stripes up as best as possible. Then I added the sleeve heads.


The buttons were difficult to pick out. Black, just faded away, different colors weren't working so eventually I picked these tan buttons. That's the good thing about working at a fabric store, you can obsess over buttons everyday until you finally pick the right ones. 


The lining is a sunback satin in a cream color. The coat is warm but not a full on winter coat warm. I wanted it to fit over some of my bulkier sweaters so that will keep me extra warm. The pattern included directions to add the back pleat, something which is missing from most of new the coat patterns I have seen. I always add a pleat and a back stay out of muslin. 


Well I'm glad to be finally finished with this jacket, and hopefully it will stop raining/snowing so I can wear it!

Pin It Now!

Monday, December 7, 2015

Stitch in Time, Dinah's Lacy Sweater


This sweater is two years in the making! I started it in AUGUST 2013. I knit the entire back, and started the front and then just left it for two years. I picked it up again in October and finished it quickly, I don't know why I was putting it off! 


The pattern is from Stitch in Time vol. 2, a lovely book with a lot of cute vintage knitting patterns in it. Most of them are knit with the tiniest needles. This is the Dinah's Lacey Sweater a pattern from the 1930s. It was actually very simple to make but the tiny needles needed, size 3, made me put it down for two years, The stitch is a twisted lacy rib. 


The yarn is an angora wool blend from St Magnus D.K. I made a hat out of this a few years ago and dreamt of a sweater from it ever since. It's so soft and fluffy! It's not itchy at all, I love wearing it. I had to order it from Dragon Yarns in Gloucestershire, UK. I can't find it anywhere in the US, and I had to patiently wait for it to come. And then the post office held it hostage because they wanted a signature! AHH! I wish somewhere closer sold it. but I would totally buy it again, it's so lovely.

I made some minor changes to the pattern. I didn't make the short sleeves as long as the picture. Maybe that was a mistake, as I kinda look big in the sweater but whatever. I also didn't put a button and loop and then neck. I'm not about being choked by my sweaters. 


The only downside is that it kinda stretches out as you wear it. The sleeves did not look this huge after if finished it. But blocking a sweater always makes it look different. I'm just gonna roll with it and not let it bother me. 


I'm so happy this is finally finished! What's your longest knitting WIP?

Pin It Now!

Tuesday, October 13, 2015

Christmas Dress: Vintage Butterick 9566


 Oh hello there. I'm back with another holiday dress. That's all I seem to post lately. This dress is the dresss of my Christmas dreams. I fell in love with the fabric at Fabricland and snatched up a few yards of it. It was on a mysterious bolt, and seems to be a vintage repro fabric. It is a very light quilt weight cotton, 45" wide. Fabricland also happened to have rick rack and buttons that perfectly match so score.

I wanted to make something vintage looking to go with the dress, but the subtle stripes kept me from choosing anything with princess seams. Then I remembered Butterick 9566 in my stash, and did a quick fba and muslin. The bust darts were very pointy, so I angled them down to make a french dart instead which worked much better for me. 

I made the dress a little differently than the directions, mainly because I didn't want to deal with the opening in the front of the skirt. So I made an invisible zipper in the back, and the bodice is just attached to the front so the whole thing doesn't hang open. The skirt is also from a modern pattern because I need to be able to move in this dress and didn't want to deal with all the fabric. The bodice is underlined in yellow, which makes the unusual color stripes pop a bit more, and the skirt is lined with the same. 

I think I look like I belong in one of my favorite Christmas movies; Pee Wee's Christmas Special, which is now streaming on netflix. Miss Yvonne and Annette Funicello have such great costumes in this movie!


Hope everyone has a Merry Christmas! 
Pin It Now!

Vintage Butterick 9566: Cotton + Steel Picnic Dress


AHH! This dress came out better than I expected, don't you love when that happens?  I have been dreaming of this dress for months waiting for the Cotton + Steel fabric to arrive at Fabricland (we had to wait for the second printing!). I just love the vintage vibe to it, I mean it has Pyrex on it! When it finally arrived the print was a lot bigger than I was imagining, so I was stumped of what dress to make with it. Finally I remembered Butterick 9566.

This is my second version of Vintage Butterick 9566. The first one is my Christmas dress, which is one of my favorite dresses, so I thought another one was in order! The bodice was already fitted, I did an FBA, and made the sleeves bigger than the original pattern. I also angled the bust dart more like a french dart, which I think gives it such a good fit. There is only thing I need to change about the pattern if I make it again, the sleeve has too much ease, it's hard to get it to fit without any blips. 


 What I like most about the pattern, is the opportunity to add my favorite thing: RICK RACK.  I think I bought 6 yards of this rick rack which is woven in different pastel colors, and that still wasn't enough. I was planning on doing another row at the hem so I might go and buy some more for that. The rick rack is all around the neckline, down the front of the buttonhole side bodice, around the sleeves and all around the hem. 


The buttons are adorable and very special. They are from the world famous sewing cave of Diary of a Sewing Fanatic! Thanks Carolyn! I had these in my stash and they are the perfect thing, so lucky!


Needless to say, I am very happy with the dress and thinking of more versions of it! 


Pin It Now!

Friday, June 5, 2015

Fruit Dress: Vintage Simplicity 2507


This dress has all my favorite things in it, rick rack, fruit prints, and spinning ability. So obviously its amazing. I needed a dress for a fashion show for the class I've been teaching since January, Project Fabricland. It's a Project Runway inspired competition for students ages 10-18. They each had to design and sew an outfit inspired by a dessert.  


My class with Sonjia Williams fro Project Runway All Stars

The dress is a vintage pattern, Simplicity 2507, but with a gathered skirt. I was afraid the fruit print was going to look weird with the paneled skirt. Plus vintage patterns are so long and I didn't feel like chopping off a million inches. I had to make the bodice bigger, and do a fba. So it was stupid to even buy the pattern I could have just copied the picture. Whatever. I seem to snatch up any vintage pattern that has an opportunity for rick rack.


The fruit print is a quilt weight cotton, as soon as it came off the UPS truck at work, I knew I had to have it. I love love love a fruit print, but I am very particular about it. I don't like it when they look lifelike, they have to look vintage kitschy. I snatched up four yards for this dress, and ended up needing more. I made the skirt SUPER gathered. Its four panels of the fabric 45" wide. It's excessive, but makes for great twirling. 


This print looks like a picnic, so the gingham rick rack was a must. I also made deep patch pockets, to fit my iphone, and because pockets are a place to put MORE rick rack. I was planning on putting rick rack on the hem, but I stopped myself. So now I have 5 extra yards of black gingham rick rack.


I bodice is a skosh too big, and about a quarter of an inch too long, but I think the skirt is heavy and pulling it down. I also made a big hem, because I love they way it looks, its about 4.5".  If you follow me on Instagram, you have seen my watermelon shoes I bought a few days before this fabric came in, making a match made in heaven! 


Pin It Now!

Wednesday, January 15, 2014

Sequin Trench Coat

Source

 I don't know where I came up with this idea but all of the sudden I NEEDED to sew a sequin trench coat. I fought it for a while but i finally gave in and got the fabric a little before Christmas. I found some inspiration on pinterest. The above picture is a Burberry trench from a few years ago, I can't image how much that would cost. The black trench below is a vintage stunner, and I think my version will look more like this. It has more of the elements of the classic trench coat but done in that fabulous sequined fabric. 
source

I picked the classic trench pattern Vogue 8884 (version 3), and spent a lot of time on the muslin. The shoulder, and armholes were way too big, and it took a while to get the fit down. I chose a silver sequin that form a circle shape. It's very thin, the sequins are sewn on netting, so I backed all the sequin pieces with cotton flannel. The facings, undercollar, and collar stand are made in a  silver silk, because the sequins would be uncomfortable touching the skin.

Its not hard to sew sequins, its just a matter of choosing the right needle. I used a microtex in a size 14. I broke a few in the beginning until I got the right one.
Vogue 8884


If you follow me on instagram (erikamadeit), you have seen a sneak peek of the process. I plan on finishing this week. Its all hemmed, I just have buttons and buttonholes to go! Pin It Now!

Monday, December 9, 2013

Christmas Craft Week: Vintage Ornament Wreath


Christmas Craft Week is back! The first project is probably also my favorite. If you follow me on Instagram (erikamadeit) you've gotten a sneak peek!  I've been OBSESSED with Georgia Peachez  and her fabulous vintage ornament wreaths forever. I mean they are the best thing ever. But I could never get my hands on one, so this year my Mother-in law and I decided to make our own.

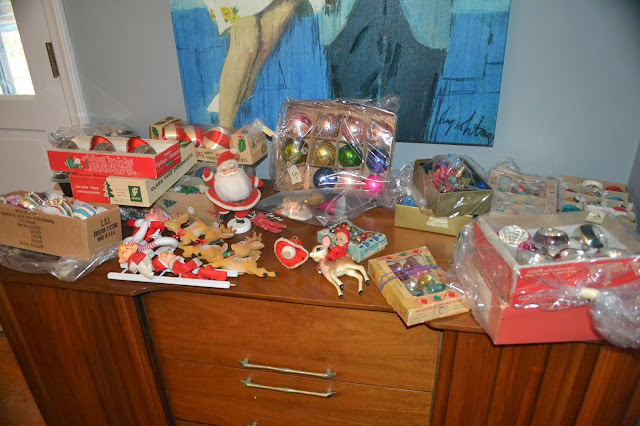
I've been collecting for the past year from some rummage sales, but haven't hit the jackpot yet. Yard sales seems to mainly have baby stuff, nothing old enough to be fun. But then we hit the motherload in Grandma's attic! She has some that were her Aunt's... extra large ones, small ones in the shiny brite boxes, some had paint that were all peeled away. I also scored some at the local antique center, along with the santas, elves and reindeer.


We watched the video tutorial from  Retro Renovation about a million times and were ready to go! OMG it is not as easy as it looks in the video. I had a burn blister after about 30 seconds. The hardest part is the beginning base of ornaments around. I couldn't do it but luckily my Mother in Law got the hang of it. You have to glue the ornaments to each other otherwise they don't stick to the tinsel garland.


After you get the base done then it becomes much easier. You figure out where to put the non ornaments (santa, reindeer with elves, and little girl for me and elves on a ladder, 2 reindeer for MIL), glue them done and then arrange the ornaments around them. We used the 14" green wreath rounds, and they look bigger than Geogia Peachez, mine ended up at 22" across!


We were surprised about how good they came out! They are definitely Georgia Peachez worthy! We spent the whole day doing this from 10am and finished at 7pm (organizing, shopping for the wreath supplies and chunky garland and lunch included). It was exhausting and my fingers are still paying the price. BUT IT WAS SO WORTH IT. It would probably been cheaper to buy one of the OG wreaths, but it was very satisfying and fun making our own.


My wreath now lives on the door to the Florida room. I'm so in love with it. I attached it to the door with one of those magnetic wreath holders. It seems pretty secure, but I'm paranoid it will break. The first thing I did this morning was check out it, yup still there, still gorgeous. I can't wait to make more!

See you tomorrow with another Christmas craft! Pin It Now!