Wednesday, December 25, 2013

Merry Christmas Cupcakes!


 Merry Christmas everyone! I wanted to share one of my favorite holiday recipes with you today. These are delicious cream cheese cupcakes, the perfect dessert. They are like little clouds of heaven, not too sweet and a big hit at any party. These were a holiday tradition from a  family friend and I finally got the recipe so we could make our own. Thanks Mrs. Martinez!

You will need:

For the cupcakes:
5 eggs
1 cup sugar
2 teaspoons vanilla
3 packs of cream cheese (8oz each)

For the topping:
16 oz container of sour cream
1 teaspoon vanilla
1/2 cup sugar
maraschino cherries
cupcake foils

Beat the eggs, sugar, vanilla and cream cheese on medium speed for about 5 minutes


Pour into cupcake mold until half full. I use a ladle 


Bake at 350 for about 30-35 minutes or until toothpick comes out clean


Mix sour cream, sugar and vanilla for topping by hand and add to cupcakes when they are cold. I tap it on the counter so the topping spreads over the cupcake. Then you top it with half of a maraschino cherry! Keep it refrigerated until you are ready to enjoy!
 That's it! (I told you they were easy)

MERRY CHRISTMAS


Cream Cheese Cupcakes

For the cupcakes:
5 eggs
1 cup sugar
2 teaspoons vanilla
3 packs of cream cheese (8oz each)

For the topping:
16 oz container of sour cream
1 teaspoon vanilla
1/2 cup sugar
maraschino cherries
cupcake foils

Preheat oven to 350 degrees

Beat the eggs, sugar, vanilla and cream cheese on medium speed for about 5 minutes
Pour into cupcake mold until half full. I use a ladle 
Bake at 350 for about 30-35 minutes or until toothpick comes out clean
Mix sour cream, sugar and vanilla for topping by hand and add to cupcakes when they are cold. I tap it on the counter so the topping spreads over the cupcake. Then you top it with half of a maraschino cherry! Keep it refrigerated until you are ready to enjoy!


Pin It Now!

Wednesday, December 18, 2013

Christmas Craft Week: Christmas Hats!

I've been whipping up some more hats! This time I made by own bases and covered them with fabric. One hat is decorated with a matching bow and Russian veiling. The second (my favorite) is covered with fabric that matches my Christmas dress (to be blogged about) with rick rack around the edge and a Christmas ornament on top! It looks like something out of Whoville!


 These hats are quick to whip up and super satisfying. First I cut a circle of buckram, hand stitch some millinery to the edge. Then I cover the top in batting and then the fabric and attach it at the bottom. Then I sew some wool felt to the bottom, attach the hair comb and decorate the top! It's a great way to use up some scrap fabric. I found the tree ornament at Michael's and cut off the loop that attaches it to the tree and just tacked it to the base of the hat. 

I had plans to make even more hats but Christmas is coming too fast! See you tomorrow with the last craft of Christmas craft week! (ok maybe it's been longer than a week, whatever)


Pin It Now!

Friday, December 13, 2013

Christmas Craft Week: Wooden Spool Garland


 I'm back with another Christmasy craft! This is the same one I made last year, except this year it is bigger and better! I was originally inspired by garland from modcloth, that was almost the same expect the fabric was just red and green with little variation. I personalized it and kept a scrap from each project I made this year and wrapped it on a wooden spool! This is a great reminder of all the cute things I sewed all year, It is my version of the "recap post".

It is super simple to do, I used the same rope and beads from last year, and just had to buy some more spools from etsy. I bought a pack of 50 and used them all up! That's a lot of projects. I kept a cup in my sewing room and every time I cut out a new project I put a scrap the cup.There is even some linings and trim on there. This is a really fun and easy way to add some sewing theme to your Christmas decor, you could even use leftover spools of thread, and wrap your fabric around that!

Have you ever made any sewing related Christmas crafts? 


Pin It Now!

Tuesday, December 10, 2013

Christmas Craft Week: Sheri Berry Holiday Quilt!


I made a quilt, for the first time ever! I found this panel on etsy, which was adorable, and quickly decided to make a quilt with it. The panel is Sheri Berry from Northcott, a few years ago. I even found a free pattern to make a quilt from the panel. I carefully followed the pattern and started collecting the fabrics for my first quilt. 

I found some other fabrics from the same collection, as well as found some suitable fabrics in my stash for the blocks. (can you see my cambie dress fabric in there?!) I also found the perfect backing fabric in my stash, 3 yards of pink cookie fabric i bought YEARS  The hardest thing about quilting is cutting with the rotary cutter. SO much cutting. I much prefer my scissors and pattern paper. I found some stripes, polka dots and adorable bow fabrics that match the fabric, all from Fabricland. They all had to be cut into strips. And I cut squares out of the other fabric.


I used my quarter inch presser foot, and started to sew all those blocks together. No back stitching, and pressing the seams to one side NOT OPEN. Quilting is weird. I followed the pattern except I added another row of the bows after the blocks. To quilt it I used the walking foot and stitched it the ditch, or at least attempted to. It was a little bit hard to do. 

I also added rick rack to the binding, following this tutorial found on pinterest. The whole thing took me about a week and a half. It was fun to make something different, but I don't think quilting is for me. 


Pin It Now!

Monday, December 9, 2013

Christmas Craft Week: Vintage Ornament Wreath


Christmas Craft Week is back! The first project is probably also my favorite. If you follow me on Instagram (erikamadeit) you've gotten a sneak peek!  I've been OBSESSED with Georgia Peachez  and her fabulous vintage ornament wreaths forever. I mean they are the best thing ever. But I could never get my hands on one, so this year my Mother-in law and I decided to make our own.

I've been collecting for the past year from some rummage sales, but haven't hit the jackpot yet. Yard sales seems to mainly have baby stuff, nothing old enough to be fun. But then we hit the motherload in Grandma's attic! She has some that were her Aunt's... extra large ones, small ones in the shiny brite boxes, some had paint that were all peeled away. I also scored some at the local antique center, along with the santas, elves and reindeer.


We watched the video tutorial from  Retro Renovation about a million times and were ready to go! OMG it is not as easy as it looks in the video. I had a burn blister after about 30 seconds. The hardest part is the beginning base of ornaments around. I couldn't do it but luckily my Mother in Law got the hang of it. You have to glue the ornaments to each other otherwise they don't stick to the tinsel garland.


After you get the base done then it becomes much easier. You figure out where to put the non ornaments (santa, reindeer with elves, and little girl for me and elves on a ladder, 2 reindeer for MIL), glue them done and then arrange the ornaments around them. We used the 14" green wreath rounds, and they look bigger than Geogia Peachez, mine ended up at 22" across!


We were surprised about how good they came out! They are definitely Georgia Peachez worthy! We spent the whole day doing this from 10am and finished at 7pm (organizing, shopping for the wreath supplies and chunky garland and lunch included). It was exhausting and my fingers are still paying the price. BUT IT WAS SO WORTH IT. It would probably been cheaper to buy one of the OG wreaths, but it was very satisfying and fun making our own.


My wreath now lives on the door to the Florida room. I'm so in love with it. I attached it to the door with one of those magnetic wreath holders. It seems pretty secure, but I'm paranoid it will break. The first thing I did this morning was check out it, yup still there, still gorgeous. I can't wait to make more!

See you tomorrow with another Christmas craft! Pin It Now!

Tuesday, December 3, 2013

I'm a Winner!

My Halloween costume was voted most creative costume in the 2013 Threads Magazine Halloween Costume Contest! Thanks to anyone that voted, and congrats to everyone that entered!


Here's what I won: a Threads prize package including Threads Fitting DVD SeriesSewing Made SimpleThreads Fitting for Every Figure, and Couture Sewing Techniques DVD. I luckily don't have any of these Threads items, and am very excited to learn some new techniques. 

Thanks Threads! 
Pin It Now!

Wednesday, November 27, 2013

Made in the USA Christmas

Source
Take the Made In USA Challenge!


It's holiday season, which brings along the stress of making gifts. As a crafty person I cannot make every single gift I have to give, it's exhausting just thinking about it. Every time I get asked "did you make that?", it's followed by "Make me one too!".  I'm more of a "selfish seamstress" and do not have the time to make that many things. 

After reading the book Overdressed: the Shockingly High Price of Cheap Fashion, I have been very wary of the things I buy. I also watched a documentary on Netflix which really made things click for me. I want to make my purchases matter, so this year for Christmas I am only buying made in America gifts. This way I know that the people making what I buy are treated fairly well (at least better than big factories in China), and the money is going back to the American economy, which badly needs it. I can feel good about what I buy, and not feel guilty for not making everything. 

I've never been into the rush of Black Friday shopping, and now it has even spread to Thursday, which is beyond crazy. If you have even seen the shoppers of Black Friday on the news, they are always fighting and over-stuffing their carts with imported, cheap, and useless crap. I have absolutely no desire to shop like that. 

It is a challenge finding the perfect gift, plus something made in America. So far I have bought 3 Made in America gifts. I even started a pinterest board of Made in America stuff. I've found everything from made in America shoes (cute ones!) to made in the USA beach chairs! Another great source for made in America clothes is Pinup Girl Clothing. Cute and made in the USA, so exciting. Also if you just search "made in USA" on Nordstroms.com you can find a ton of USA goods, in a range of prices. Etsy and buying vintage are also great ways to buy USA. There are a ton of options out there once you start to look. 


Tiki Dress made in USA


What are you making and buying for the Holidays? Will you sign up for the Made In the USA challenge? What do people outside of the USA think, will you buy local too?


Pin It Now!

Friday, November 15, 2013

Falling Leaves Hat!


I am officially obsessed with HATS! If you follow me on pinterest, you will see I am constantly pinning hats, especially ones made by the fabulous and inspiring; Frollein Von Sofa. She has the most adorable hats and I am completely in awe of her talent. Just take a peek and you will be hooked! One day I hope to own one of her hats (or shoes!) but until then I'm going to try and make my own. 

I wanted to make my own hat, originally to go with my Halloween costume, but it has since evolved into a Autumn hat. I had these pumpkins from the dollar section of Target. The suede, colored leaves I collected from this amazing store in NYC, Tinsel Trading co. According to their website it's Martha Stewart's "most favorite store in the world". If its good enough for Martha its good enough for me! 

The brown teardrop hat base is from etsy, as well as the comb that I hand stitched to the base. The trick to making a dimensional hat is to have some height with the pumpkin. I originally started to play with the leaves leaving them flat, but that made the pumpkin look silly. I used the hot glue gun to attach everything. The leaves are glued to the side of the pumpkin, and the glue is hidden with a sprig of berries. Of course I added some brown sparkly rick rack to the edge, which is from Fabricland.

I really loved how much fun this was to make and wear. I got some mixed reviews while wearing this in public, the lady at the post office yelled across the store how much she loved it! But I also got some confused faces and second glances. Lol. Guess it's not for everyone!

This was a no stress project, and I'm collecting stuff for some holiday hats! Heading to the garment district this weekend for some millinery wire to make my own hat bases with buckrum. Once I get the hang of that I can use my own fabric to cover hats! The possibilities are endless! 


Pin It Now!

Tuesday, November 12, 2013

Liberty Madness


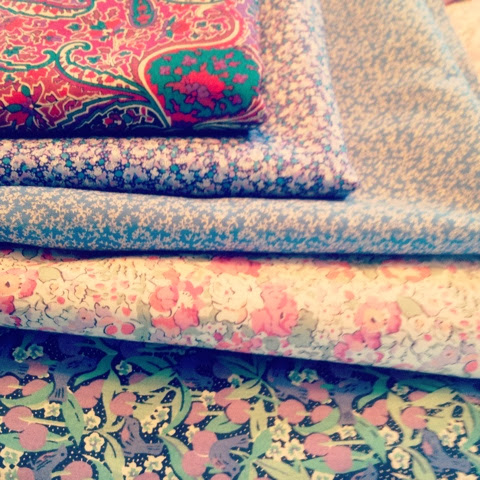
OMG you guys, I have hit the jackpot. I recently found a bunch of vintage Liberty of London fabric on the remnant table. It is kind of rare and expensive here in the USA., and to see it anywhere except NYC around me was kind of amazing.  Some were full yards of fabric others were bits and pieces already cut. There was even some for free in the scrap basket! AHHH! I'm the kind of person that squeals for joy in a store. People think I'm crazy.


I can spot a liberty fabric from a mile away. There is just something so distinct and lovely about it. And they are SO SOFT.  These fabrics are all Tana Lawn and 36 inches wide. There is no writing on the selvage, the print goes all the way to the edge. From what I gathered on the internet both of these facts= vintage. They were from group of fabrics that were dated from the late 80s early 90s. 

I went home and sorted it into piles on the floor. Most are recognizable prints, (Nike is even using them for sneakers now) and some I have never really seen before. One piece even has the tag on it from the Liberty shop!


I listed some of the 1 yard and over pieces in my Etsy shop. Now to decide what to do with all the scrap pieces. Some are very long (maybe 10 inches in width and 2 yards) some are square sizes.I could make a quilt for myself. The liberty quilts online are gorgeous but I find the idea very daunting. Quilting just may not be fore me..cutting out all those little pieces with the rotary cutter gives me anxiety. I have seen bags of Liberty scraps sold on Etsy, not sure if I should do this and am open to suggestions. 


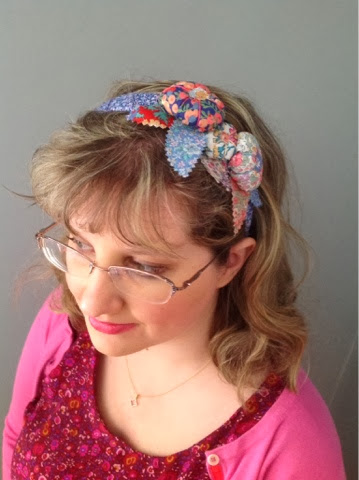
I did make myself a headband with some of the scraps. The tutorial can be found on the Liberty website.           


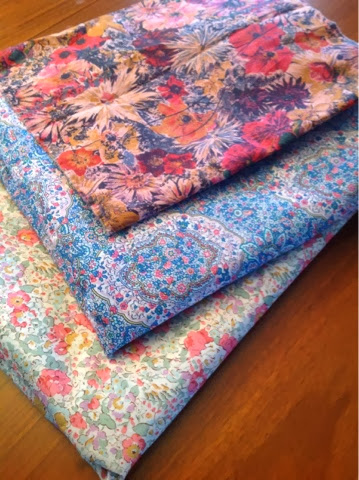
These are the fabrics I HAD to keep for myself. This paisley is everything. There is 2 yards of it. Not sure what to do with it yet, but it will be beautiful. The floral on the bottom may become the Simplicity blouse 2154. There are a lot of versions of this blouse floating around the internet and they are all cute. 

So have you ever found some Liberty? Have you ever sewn with it? Any advice as to what to do with the scraps?
Pin It Now!